Crochet problems…you know the feeling…you’ve bought the crochet pattern, you’ve lovingly stroked, I mean selected, your yarn, and you’ve hooked with dedication for hours – then suddenly it dawns on you, something isn’t quite right!
Is this going to fit?
What’s that gap in the top of my hat?
Worse still, what’s that ruddy great hole doing in the middle of my blanket?
We’ve probably all been there at one time or another, right?
These are just some of the common problems faced by beginners starting out with crochet (and knitting for that matter). Fortunately, there’s a simple solution to each and every one of these problems and I hope to look at these (and others) over the next few posts. So, pull up a chair, come on in and let’s chat about the first of them :)
Is my crochet going to fit?

Illustration used with kind permission of Anne Marie Jones. © Anne-Marie Jones Illustrations, 2014.
Leaving aside the fact that your baby might be bigger (or smaller) than the average, or that Uncle Bob ate all the pies, your recipient will hopefully, at the very least, fit into some size range in the pattern. Crochet pattern designers spend a lot of time working out the calculations for all these sizes and better still, to make sure you get it right, they provide you with some very important information. In the UK we call it tension but in the US it’s known as gauge. Whatever the name, they both mean the same thing.
Contrary to popular belief, isn’t there to make your life difficult, honestly! It’s there to make sure that the item you end up with is the size the designer intended.
Gauge or tension is generally written in two parts:
- a number of crochet stitches over a given measurement
- a number of rows over a given measurement
The measurement part is commonly 1, 2 or 4 inches but this can vary. I’ve even seen some patterns where the designer will tell you what diameter your circle should be at a given stage. But regardless of how it’s written, it’s pretty vital information.
So, how do you use it?
Depending on what you are making, there are several ways to begin. Some people like to make a swatch. This is just a posh way of saying a sample made using the hook, yarn and stitch that will be used for the pattern – it should be a little larger than the measurement the gauge is measured over. Others like to jump straight in and start the project straight away. If you’re doing it this way, make sure there are enough stitches and rows to compare on the section you are working.
There are pros and cons to both methods and I’ve been known to do both, depending on the item in question. But, ultimately, the bigger the project is, the more useful a swatch will be – let’s face it no-one wants to start, re-start and possibly re-start again when they’ve got a foundation chain of 200 for Row 1!
Once you have your swatch, grab a tape measure (or use a pre-cut square like mine) and count your stitches and rows.
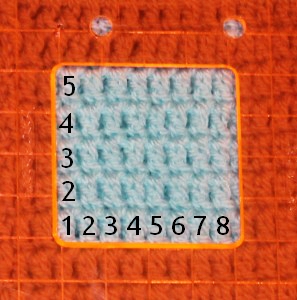
As you can see, in this swatch I have 8 UK trebles (US double crochets) and 5 rows to 2″.
Next you need to compare how many stitches/rows you have, with how many stitches/rows the designer says you need.
If you have too many of either, then your stitches are probably too small. Make them bigger by trying again with a bigger hook.
If you have too few of either, then your stitches are probably too big. Make them smaller by trying again with a smaller hook.
Too many = too small = try a bigger hook.
Too few = too big = try a smaller hook.
You might need to do this a few times before it’s right. But, once you’ve got it, you are good to go, happy in the knowledge that that your item will be a perfect fit, (even on Uncle Bob)!
What problems have you faced? Why not let me know! I can’t promise to have all the answers but, with the help of some very good friends over at the Mad Mad Makers, I may know a (wo)man who does ;)